HaskaSu GameDesign X Algorithm X TypeScript Trick 6
About Color Spaces and Their Variations
Color Spaces
The most common color space is undoubtedly RGB; composed of three 8-bit (0~255) numbers [255, 255, 255] representing Red, Green, Blue respectively.
Sometimes a fourth dimension is added as the Alpha value (transparency) to become RGBA [255, 255, 255, 255], becoming a 32-bit value with 4 8-bit components, which can be stored in an integer and is often expressed in hexadecimal, e.g., 0xFF_FF_FF_FF.
In the field of computer graphics, the RGB color space is very convenient because the principle of RGB is similar to that of the human visual system.
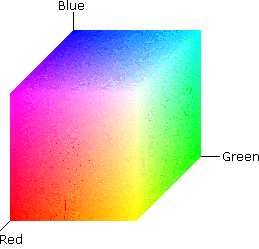
However, there are more color spaces available than just RGB. In theory, any three colors with 100% saturation and a 120-degree color difference can serve as primary colors.
HSV Color Space
Another commonly used color space is HSV.
- Hue represents the basic property of color, which is commonly referred to as the color name, such as red, yellow, etc.
- Saturation refers to the purity of the color. The higher the saturation, the purer the color, and the lower it gradually turns gray, taking values from 0-100%.
- Value, Lightness, and Brightness all take values from 0-100%.
P.S. In the book, it is referred to as HSB, with Brightness replacing Value.
One of the main reasons for using HSV is that many color theory techniques are based on the HSV color space, such as complementary colors, triadic colors, split complementary colors, similar colors, etc.

Implementation
The implementation here is through GLSL on the ShaderToy website.
The code is as follows:
const vec3 StartCol = vec3(1.0, .0, .0);
const vec3 EndCol = vec3(.0, 1.0, .0);

vec3 HSV2RGB(vec3 c)
{
    vec4 K = vec4(1.0, 2.0 / 3.0, 1.0 / 3.0, 3.0);
    vec3 p = abs(fract(c.xxx + K.xyz) * 6.0 - K.www);
    return c.z * mix(K.xxx, clamp(p - K.xxx, 0.0, 1.0), c.y);
}

vec3 RGB2HSV(vec3 c)
{
    vec4 K = vec4(0.0, -1.0 / 3.0, 2.0 / 3.0, -1.0);
    vec4 p = mix(vec4(c.bg, K.wz), vec4(c.gb, K.xy), step(c.b, c.g));
    vec4 q = mix(vec4(p.xyw, c.r), vec4(c.r, p.yzx), step(p.x, c.r));

    float d = q.x - min(q.w, q.y);
    float e = 1.0e-10;
    return vec3(abs(q.z + (q.w - q.y) / (6.0 * d + e)), d / (q.x + e), q.x);
}

void mainImage( out vec4 fragColor, in vec2 fragCoord )
{
    vec2 uv = fragCoord/iResolution.y;
    vec3 black = vec3(0.0);
    vec3 white = vec3(1.0);
    uv *= 2.;
    uv -= 1.;
    uv.x -= .75;

    float yStep = step(0., uv.y);
    vec3 color = vec3(uv, 0.);
    color = mix(black, white, yStep);

    float rStep = step(.4, length(abs(uv) - vec2(0.5, 0.5)));
    float xStep = step(0., uv.x);

    float colorT = (sin(iTime * 1.5) + 1.) / 2.;
    vec3 circleColRBG = mix(StartCol, EndCol, colorT);
    vec3 circleColHSB = mix(RGB2HSV(StartCol), RGB2HSV(EndCol), colorT);
    circleColHSB = HSV2RGB(circleColHSB);

    vec3 circleCol = mix(circleColRBG, circleColHSB, xStep);

    color = mix(circleCol, color, rStep);

    fragColor = vec4(color,1.0);
}
Results
Explanation
    vec2 uv = fragCoord/iResolution.y;
    vec3 black = vec3(0.0);
    vec3 white = vec3(1.0);
    uv *= 2.;
    uv -= 1.;
    uv.x -= .75;
First, adjust the coordinates to the desired position.
    float yStep = step(0., uv.y);
    vec3 color = vec3(uv, 0.);
    color = mix(black, white, yStep);
Split the colors into black above and white below mainly to compare the visual differences when the background color changes during color gradient.
float rStep = step(.4, length(abs(uv) - vec2(0.5, 0.5)));
Next, decide the range of the circle, where the distance from the coordinate (±0.5, ±0.5) is less than 0.4, it is considered within the circle.
float xStep = step(0., uv.x);
This section determines whether the circle is on the left or right side of the X-axis. RGB transformation is applied to the left side, while HSV transformation is applied to the right side.
    float colorT = (sin(iTime * 1.5) + 1.) / 2.;
    vec3 circleColRBG = mix(StartCol, EndCol, colorT);
    vec3 circleColHSB = mix(RGB2HSV(StartCol), RGB2HSV(EndCol), colorT);
    circleColHSB = HSV2RGB(circleColHSB);
Finally, use Mix for Tweening. Mix performs interpolation.
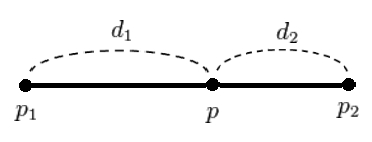
Interpolation of vec3 is interpolation for each component (x, y, z).
RGB directly interpolates, while HSV needs to be first converted from RGB to HSV, interpolated, and then converted back to RGB.
Comparison of Results
As can be seen, when the RGB on the left side undergoes gradient transformation, there is a moment where the overall color drops in the middle, turning into a dark brown color. Meanwhile, the HSV variation always maintains a high brightness color, but at one point, it becomes a color that is neither red nor green.
As for which effect is better, it depends on subjective judgment. The choice depends on the style of the product and can be decided by consulting the art team.